iOS universal framework
January 9, 2016
In Xcode framework is not just one - they are many of them and in this little article I am going to scratch the surface of the way to build iOS universal framework.
Creation of the project
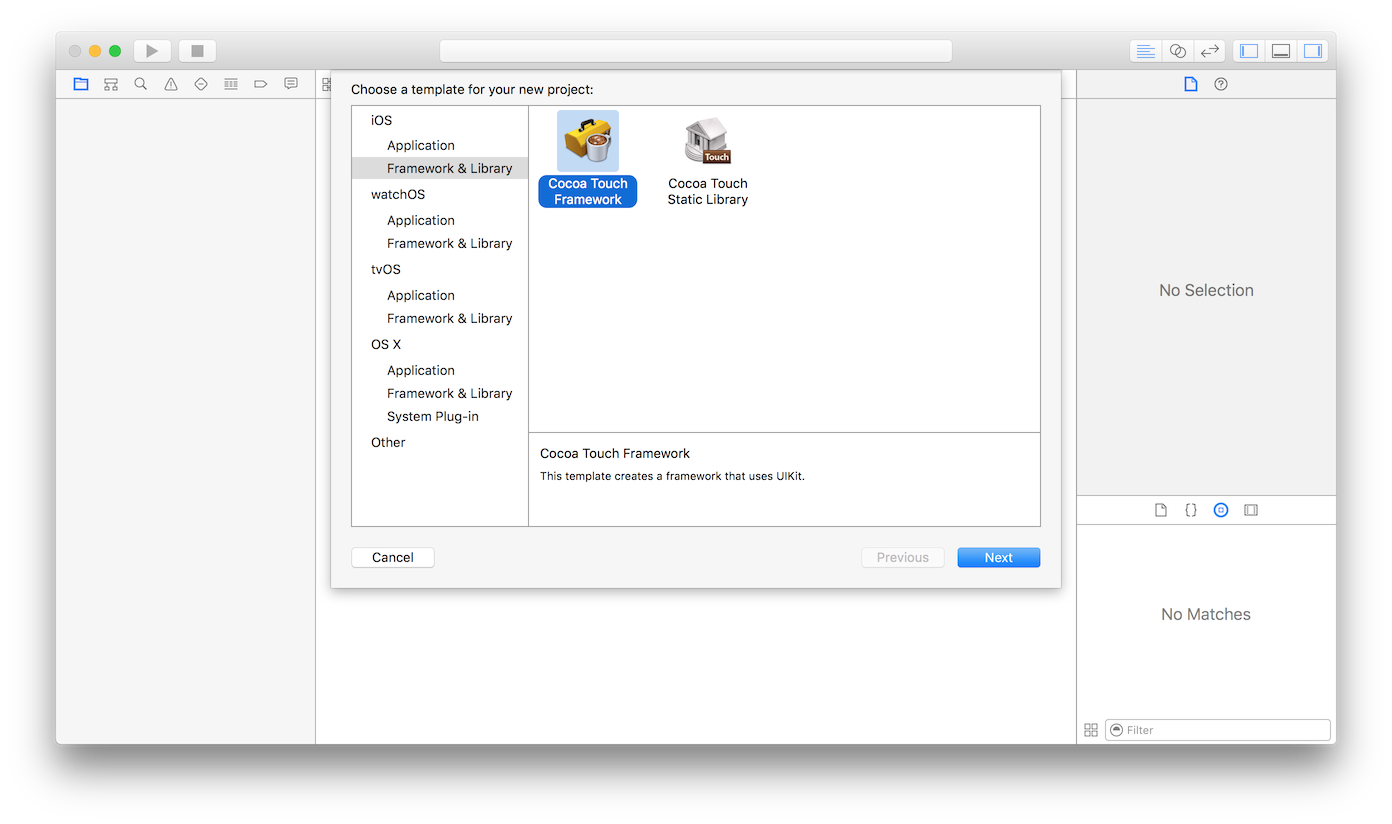
First of all we need to create a new project. When you are asked to select a template, navigate to iOS > Framework & Library > Cocoa Touch Framework.
Afterwards give it a name and select the language you would like to use. I recommend selecting Swift, since we are going to use it as an example. But don't worry - you can mix Objective-C and Swift classes in this framework. I know, I know, it is cool.
Creating sample classes
Now we can encapsulate some cool code here. We are going to create some sample class that will be returning a configured welcoming
Create sample class named
import UIKit

public class WelcomeAlert {

    public class func create() -> UIAlertController {
        let alert = UIAlertController(title: "Welcome!",
            message: "Some random welcoming message",
            preferredStyle: .Alert
        )
        alert.addAction(
            UIAlertAction(title: "OK", style: .Default, handler:{ _ in })
        )

        return alert
    }

}
Now I want to make you pay attention to
With Objective-C it is a little bit different, so lets create another class in Objective-C, so you would see the difference. Lets create a class, that is going to be creating another
#import <UIKit/UIKit.h>

@interface QuestionAlert : NSObject

+ (UIAlertController *)alertWithQuestion:(NSString *)question;

@end

@implementation QuestionAlert

+ (UIAlertController *)alertWithQuestion:(NSString *)question {
    UIAlertController *alert = [UIAlertController alertControllerWithTitle:@"Question"
                                                                   message:question
                                                            preferredStyle:UIAlertControllerStyleAlert];
    UIAlertAction *yesAction = [UIAlertAction actionWithTitle:@"YES" style:UIAlertActionStyleDefault handler:nil];
    UIAlertAction *noAction = [UIAlertAction actionWithTitle:@"NO" style:UIAlertActionStyleDestructive handler:nil];
    [alert addAction:yesAction];
    [alert addAction:noAction];

    return alert;
}

@end
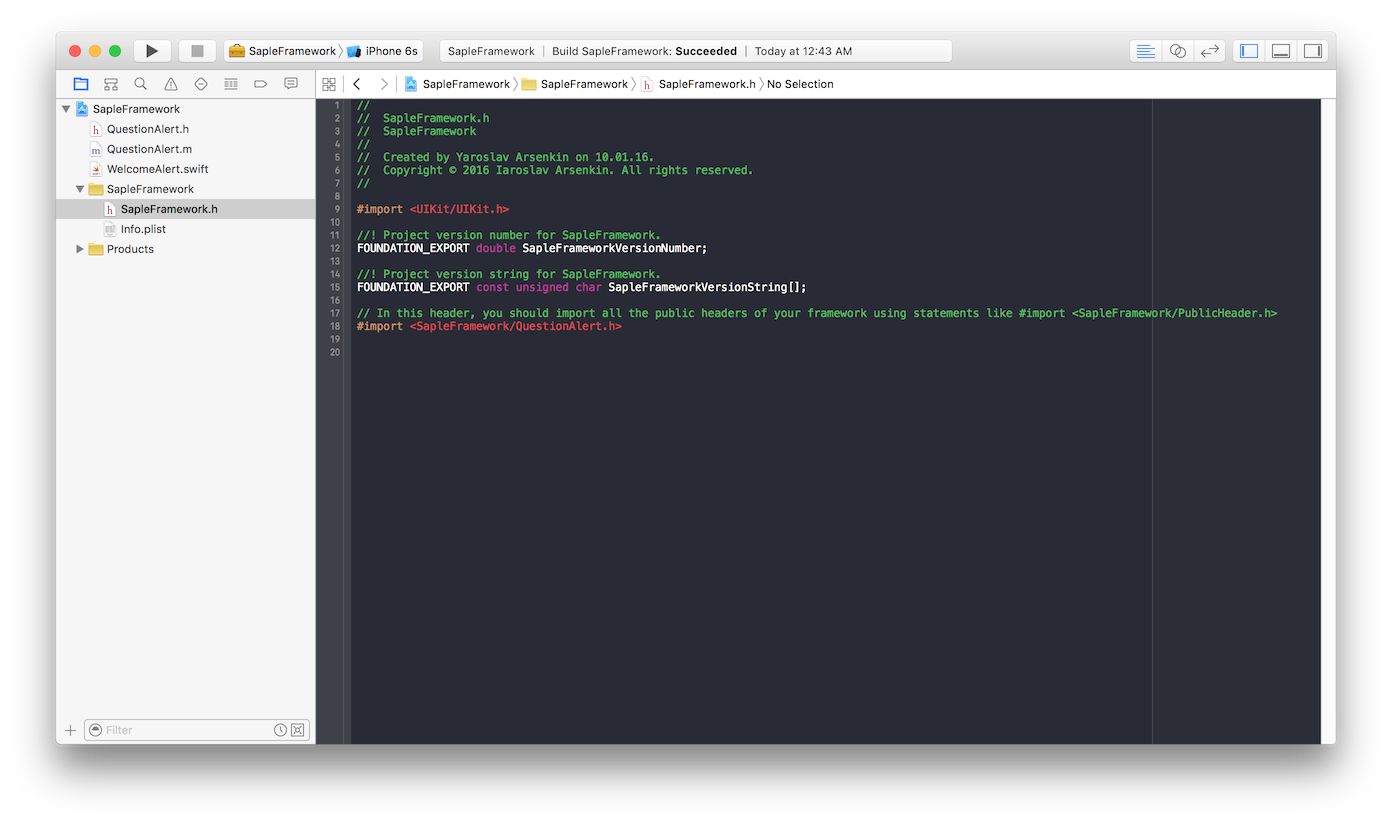
Nothing special. But. In order to make an Objective-C class being publicly available for the users who are going to import this universal framework you have to select
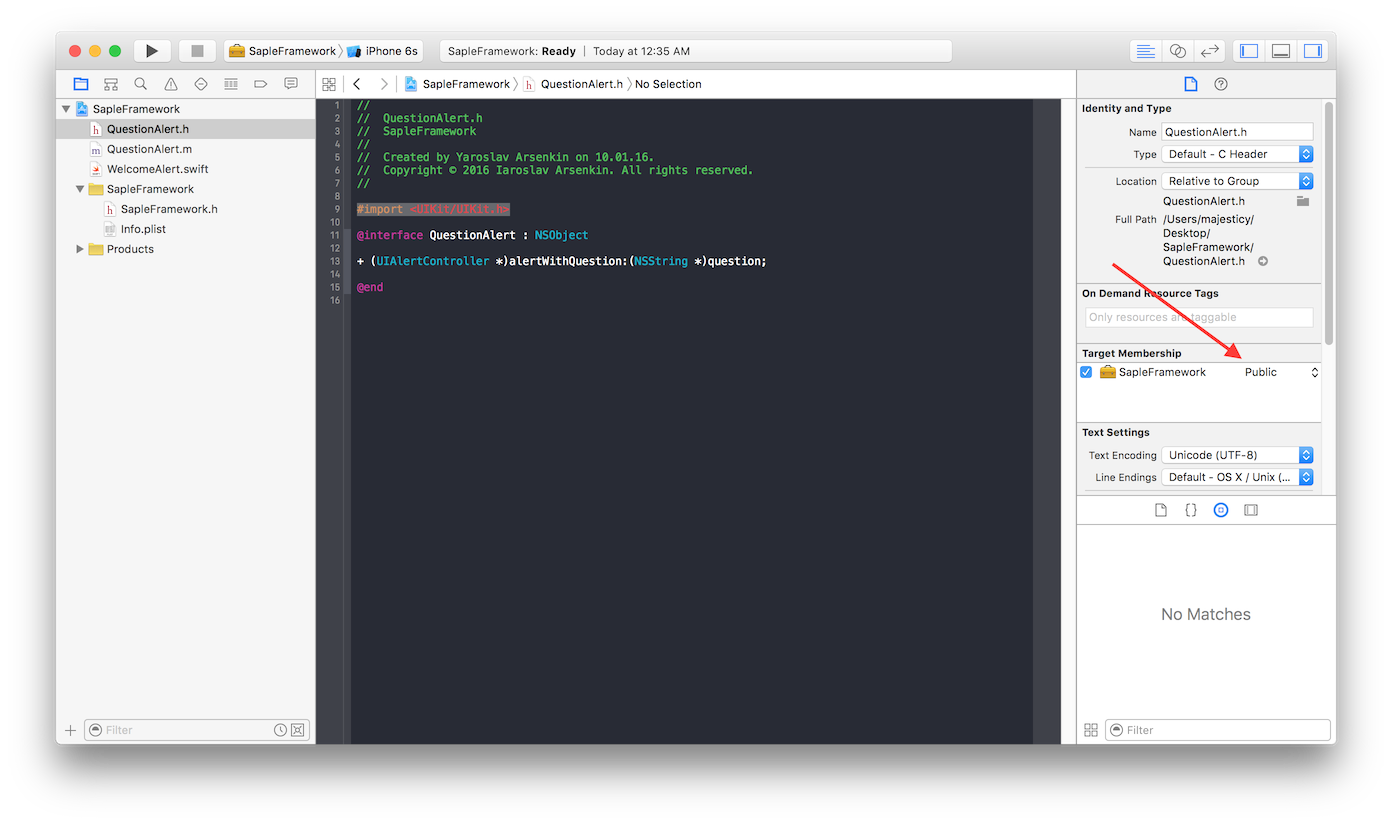
and import this class into
Now you know how to create your classes both in Swift and Objective-C. Now we need to configure our project and make it exportable as a universal framework.
Building framework as universal one
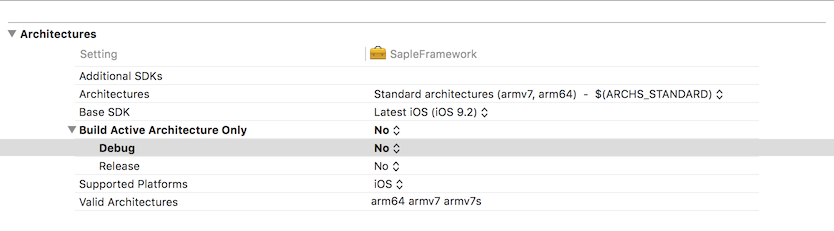
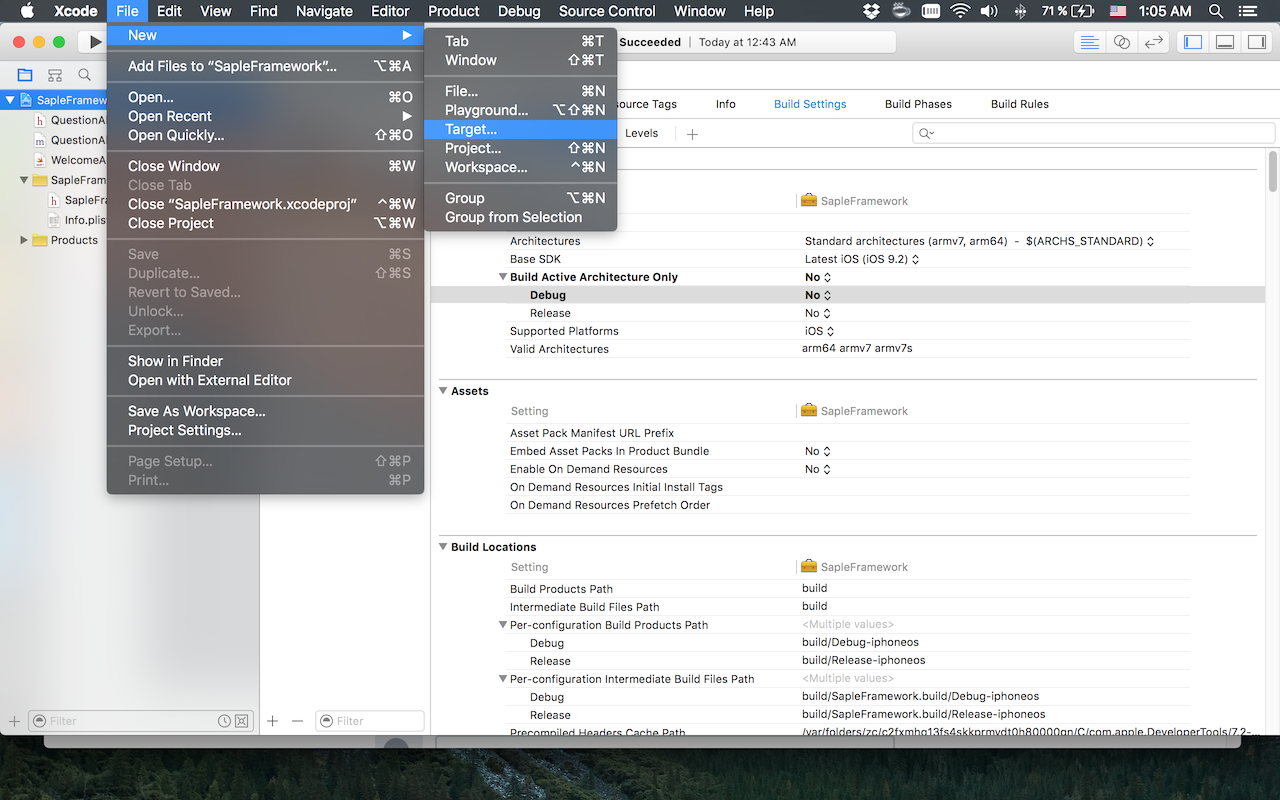
When you build your framework it is going to be build for the architecture that you currently building for, for instance, i386 in case you build for simulator. But we need also x86_64 architectures. So firstly you need to turn this setting in
After that you have to create new target, that is going to be making this magic of building a universal framework:
Navigate to
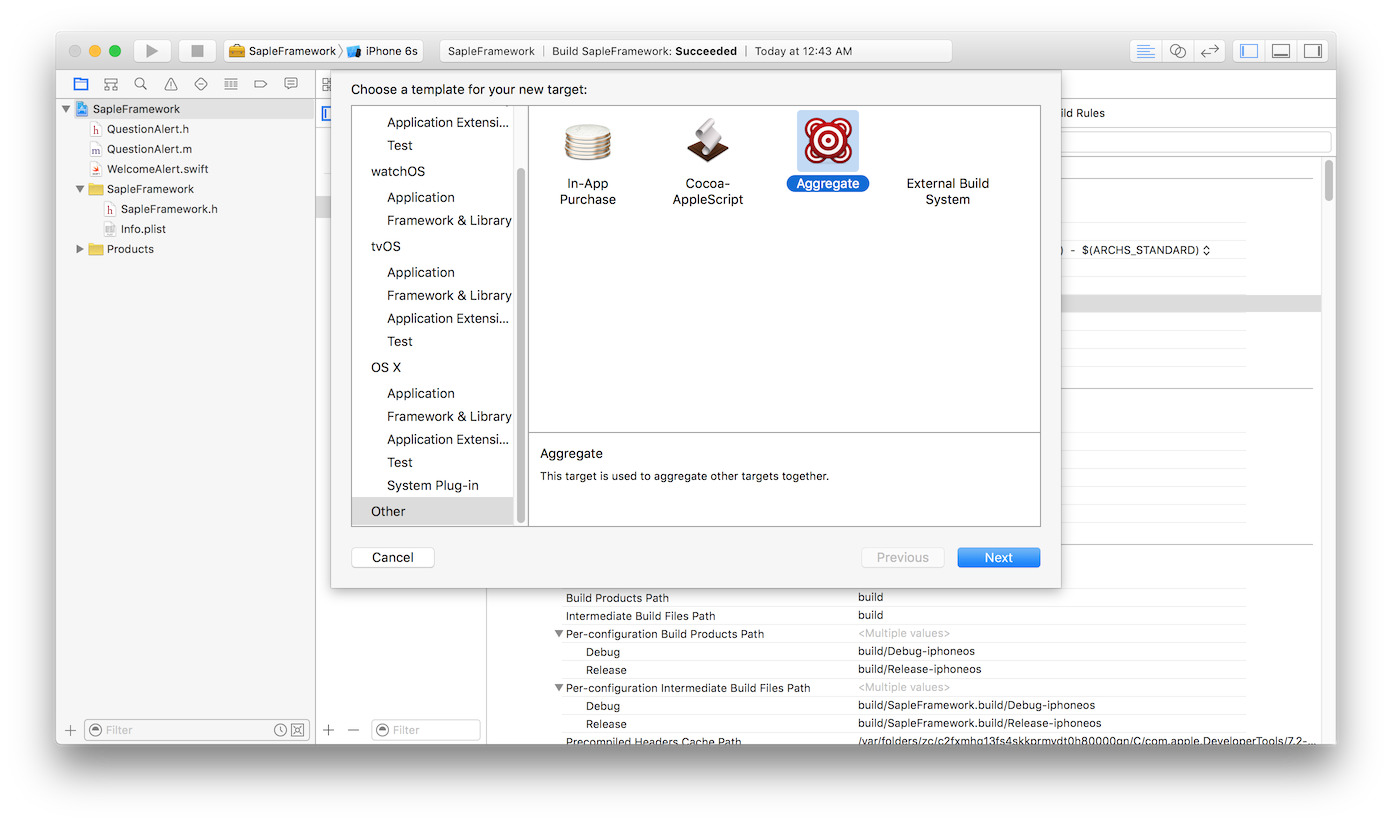
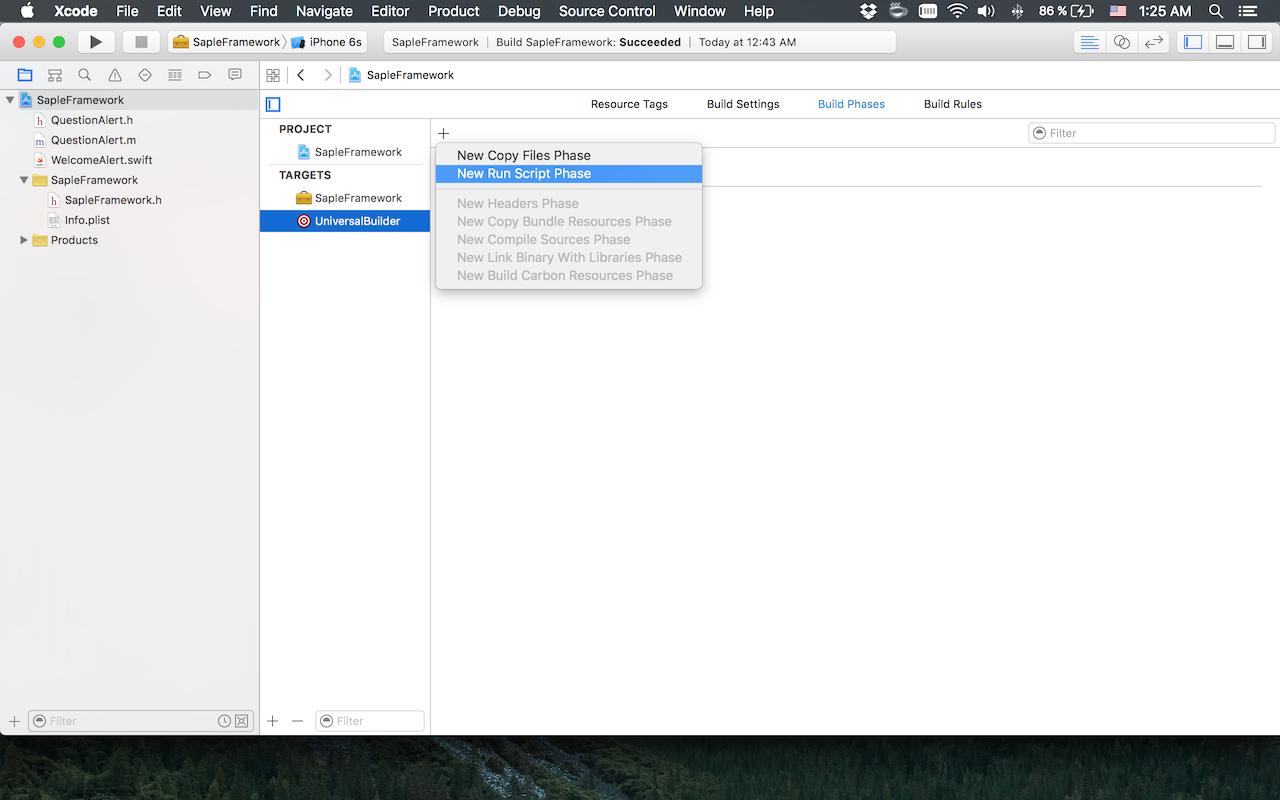
Give it a name and hit Finish. Then select your newly created target and navigate to Build Phases and add New Run Script Phase to include our little script, that is going to be gluing development and production versions of your framework (by production I mean ability to use it via Simulator).
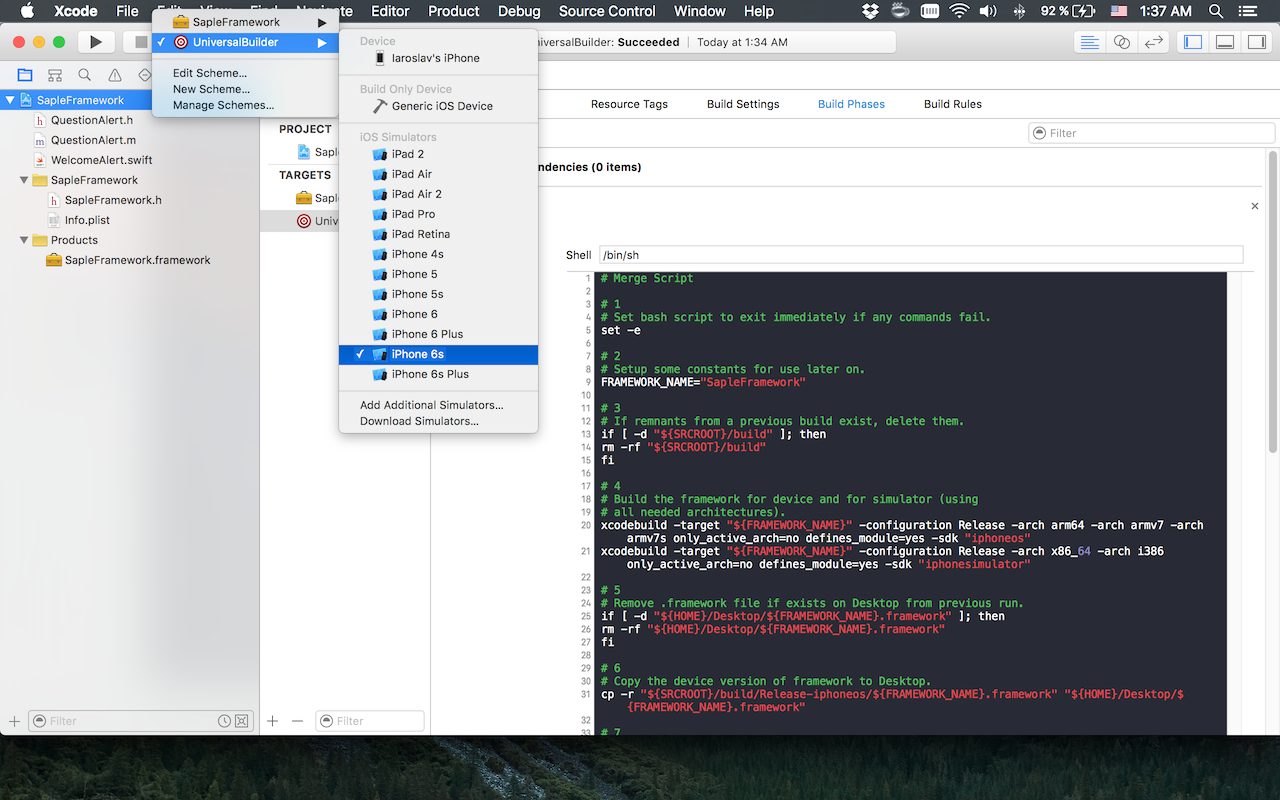
And now the fun part - I have saw this script in blog of some fellow developer, so hit me with link to it in case you see it, I will make a reference to it. Anyways, here is the script, that is going to place the resulting framework into your Desktop folder. But be careful - don't forget to rename the line number 9 and include the name of your framework there.
# Merge Script

# 1
# Set bash script to exit immediately if any commands fail.
set -e

# 2
# Setup some constants for use later on.
FRAMEWORK_NAME="SampleFramework"

# 3
# If remnants from a previous build exist, delete them.
if [ -d "${SRCROOT}/build" ]; then
rm -rf "${SRCROOT}/build"
fi

# 4
# Build the framework for device and for simulator (using
# all needed architectures).
xcodebuild -target "${FRAMEWORK_NAME}" -configuration Release -arch arm64 -arch armv7 -arch armv7s only_active_arch=no defines_module=yes -sdk "iphoneos"
xcodebuild -target "${FRAMEWORK_NAME}" -configuration Release -arch x86_64 -arch i386 only_active_arch=no defines_module=yes -sdk "iphonesimulator"

# 5
# Remove .framework file if exists on Desktop from previous run.
if [ -d "${HOME}/Desktop/${FRAMEWORK_NAME}.framework" ]; then
rm -rf "${HOME}/Desktop/${FRAMEWORK_NAME}.framework"
fi

# 6
# Copy the device version of framework to Desktop.
cp -r "${SRCROOT}/build/Release-iphoneos/${FRAMEWORK_NAME}.framework" "${HOME}/Desktop/${FRAMEWORK_NAME}.framework"

# 7
# Replace the framework executable within the framework with
# a new version created by merging the device and simulator
# frameworks' executables with lipo.
lipo -create -output "${HOME}/Desktop/${FRAMEWORK_NAME}.framework/${FRAMEWORK_NAME}" "${SRCROOT}/build/Release-iphoneos/${FRAMEWORK_NAME}.framework/${FRAMEWORK_NAME}" "${SRCROOT}/build/Release-iphonesimulator/${FRAMEWORK_NAME}.framework/${FRAMEWORK_NAME}"

# 8
# Copy the Swift module mappings for the simulator into the
# framework.  The device mappings already exist from step 6.
cp -r "${SRCROOT}/build/Release-iphonesimulator/${FRAMEWORK_NAME}.framework/Modules/${FRAMEWORK_NAME}.swiftmodule/" "${HOME}/Desktop/${FRAMEWORK_NAME}.framework/Modules/${FRAMEWORK_NAME}.swiftmodule"

# 9
# Delete the most recent build.
if [ -d "${SRCROOT}/build" ]; then
rm -rf "${SRCROOT}/build"
fi
Now is the last step: build! To make it work you have to select Simulator and select your newly created Aggregate target like this:
Don't be afraid in case by the habit hit Run and nothing happened - it is normal. Why? Because you have to Build.
Update
As pointed out by @Indigo333 - before submitting your app to the AppStore we need to get rid of the simulator binaries that our "fat" framework is going to hold.
In order to do that, you have to create another
APP_PATH="${TARGET_BUILD_DIR}/${WRAPPER_NAME}"

# This script loops through the frameworks embedded in the application and
# removes unused architectures.
find "$APP_PATH" -name '*.framework' -type d | while read -r FRAMEWORK
do
    FRAMEWORK_EXECUTABLE_NAME=$(defaults read "$FRAMEWORK/Info.plist" CFBundleExecutable)
    FRAMEWORK_EXECUTABLE_PATH="$FRAMEWORK/$FRAMEWORK_EXECUTABLE_NAME"
    echo "Executable is $FRAMEWORK_EXECUTABLE_PATH"

    EXTRACTED_ARCHS=()

    for ARCH in $ARCHS
    do
        echo "Extracting $ARCH from $FRAMEWORK_EXECUTABLE_NAME"
        lipo -extract "$ARCH" "$FRAMEWORK_EXECUTABLE_PATH" -o "$FRAMEWORK_EXECUTABLE_PATH-$ARCH"
        EXTRACTED_ARCHS+=("$FRAMEWORK_EXECUTABLE_PATH-$ARCH")
    done

    echo "Merging extracted architectures: ${ARCHS}"
    lipo -o "$FRAMEWORK_EXECUTABLE_PATH-merged" -create "${EXTRACTED_ARCHS[@]}"
    rm "${EXTRACTED_ARCHS[@]}"

    echo "Replacing original executable with thinned version"
    rm "$FRAMEWORK_EXECUTABLE_PATH"
    mv "$FRAMEWORK_EXECUTABLE_PATH-merged" "$FRAMEWORK_EXECUTABLE_PATH"

done
After pasting this, each time you are going to Build your project this script will run through framework you included and strip-out binaries for architectures that are not being using.
Conclusion
Once you Build your project - you will see your newly created framework in the Desktop directory. Now just drop this framework into you another project, import it in the file where you need to access your classes and be happy.